> ## Documentation Index
> Fetch the complete documentation index at: https://docs.attention.com/llms.txt
> Use this file to discover all available pages before exploring further.
# Single Sign-On (SSO)
> How to setup Single Sign-On for your org.
Attention supports Single Sign-On through Google, Okta, and Microsoft EntraID.
## **Google SSO Setup**
1. Go to the Google Cloud Platform and choose your project: [https://console.cloud.google.com/apis/credentials](https://console.cloud.google.com/apis/credentials)
2. Click on `+ Create Credentials` and choose `OAuth client ID`
3. Choose `Web application` as application type and give a name.
4. Under `Authorized Redirect URIs`, paste the following URI:
[https://id.attention.tech/ui/login/login/externalidp/callback](https://id.attention.tech/ui/login/login/externalidp/callback)
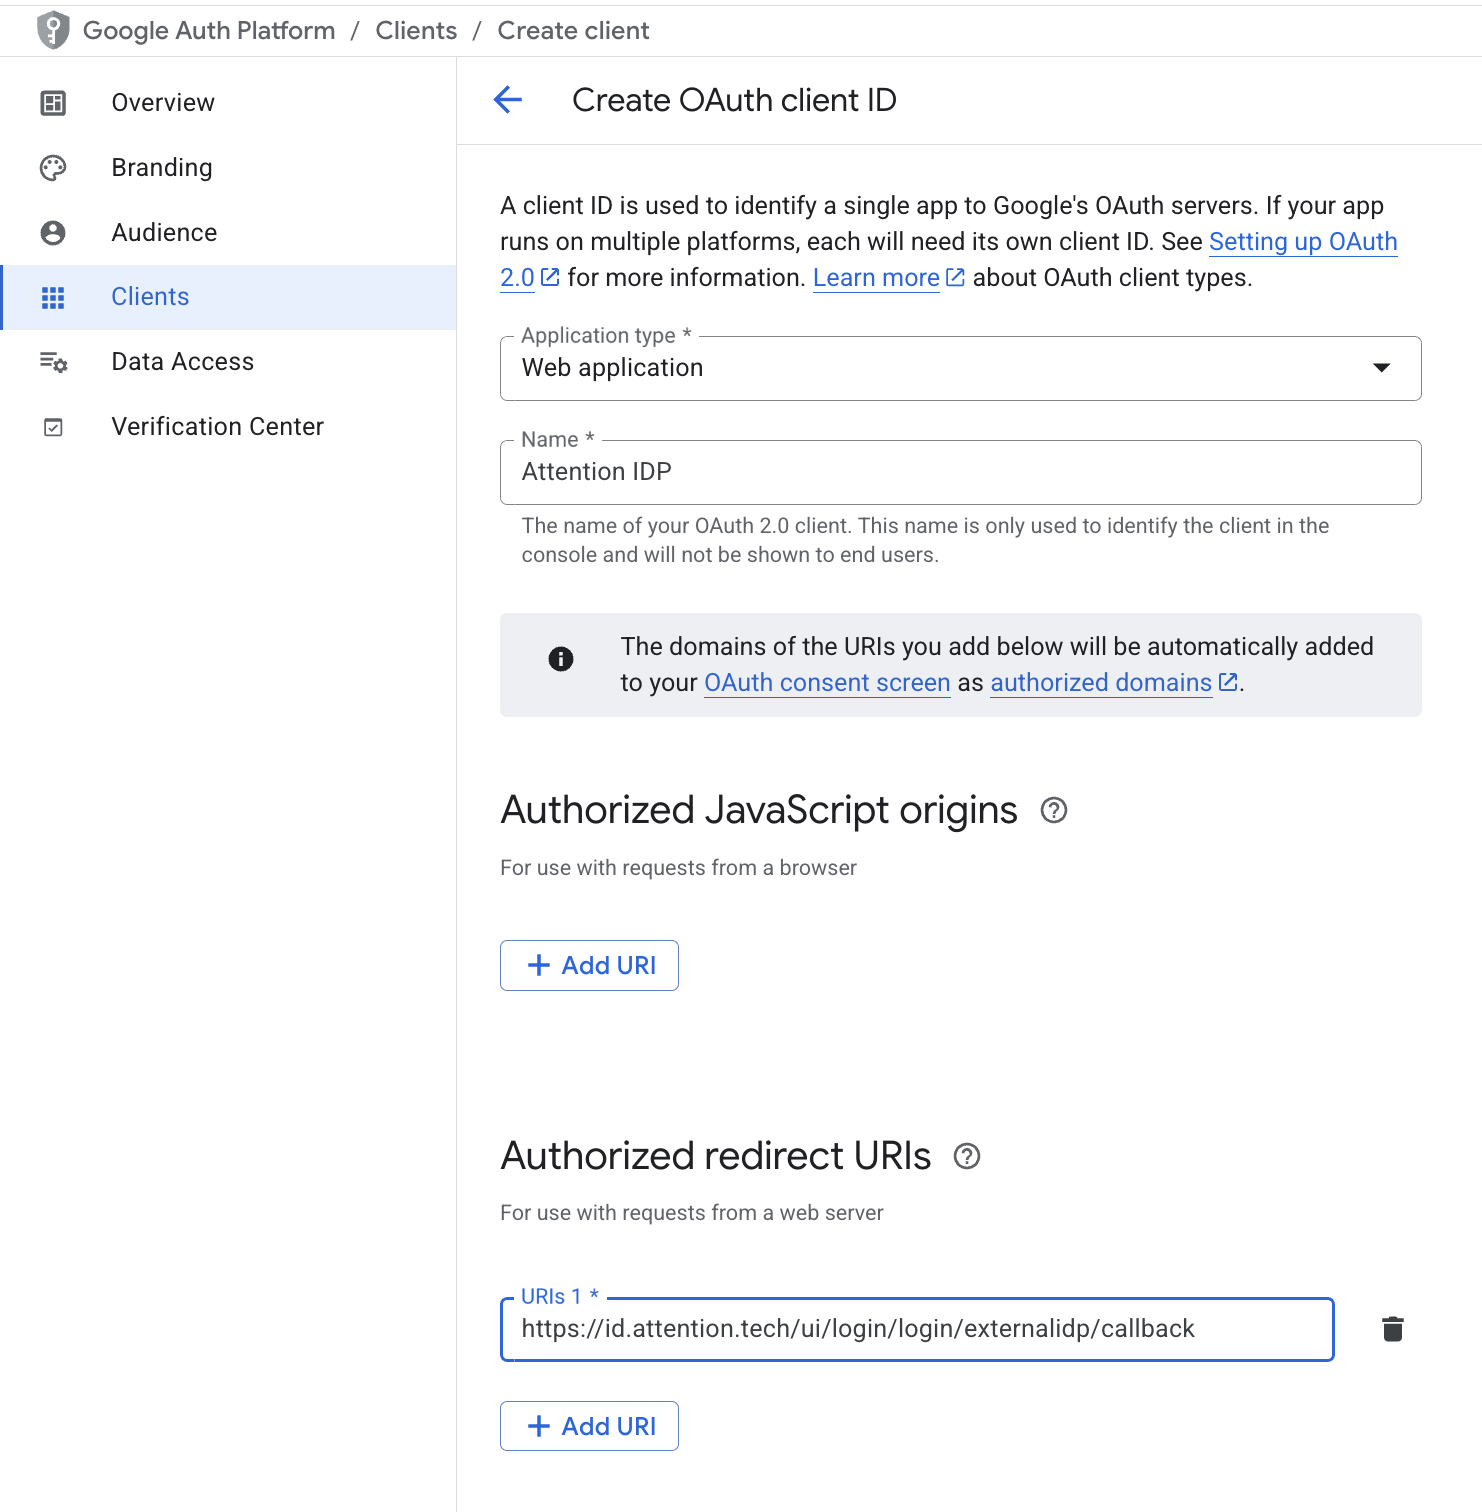 5. After saving, a **Client ID** and **Client Secret** will be generated. Provide these to your Attention point of contact to finalize setup.
6. After doing this, the Attention team will follow up with the URL your team needs to use log in with Google OAuth. This URL will take you directly to your Google account login. Once you log in successfully, you will be redirected automatically to the Attention paltform homepage.
NOTE: The authentication mechanism does not auto provision users on Attention. Users must be invited to Attention before trying to authenticate via Google.
## **Okta SSO Setup**
1. As an Okta administrator, log into the administration panel and navigate to the list of applications.
2. Once there, click to create a new App Integration, and choose `OIDC - OpenID Connect`.
3. Choose `Web Application` as the application type.
5. After saving, a **Client ID** and **Client Secret** will be generated. Provide these to your Attention point of contact to finalize setup.
6. After doing this, the Attention team will follow up with the URL your team needs to use log in with Google OAuth. This URL will take you directly to your Google account login. Once you log in successfully, you will be redirected automatically to the Attention paltform homepage.
NOTE: The authentication mechanism does not auto provision users on Attention. Users must be invited to Attention before trying to authenticate via Google.
## **Okta SSO Setup**
1. As an Okta administrator, log into the administration panel and navigate to the list of applications.
2. Once there, click to create a new App Integration, and choose `OIDC - OpenID Connect`.
3. Choose `Web Application` as the application type.
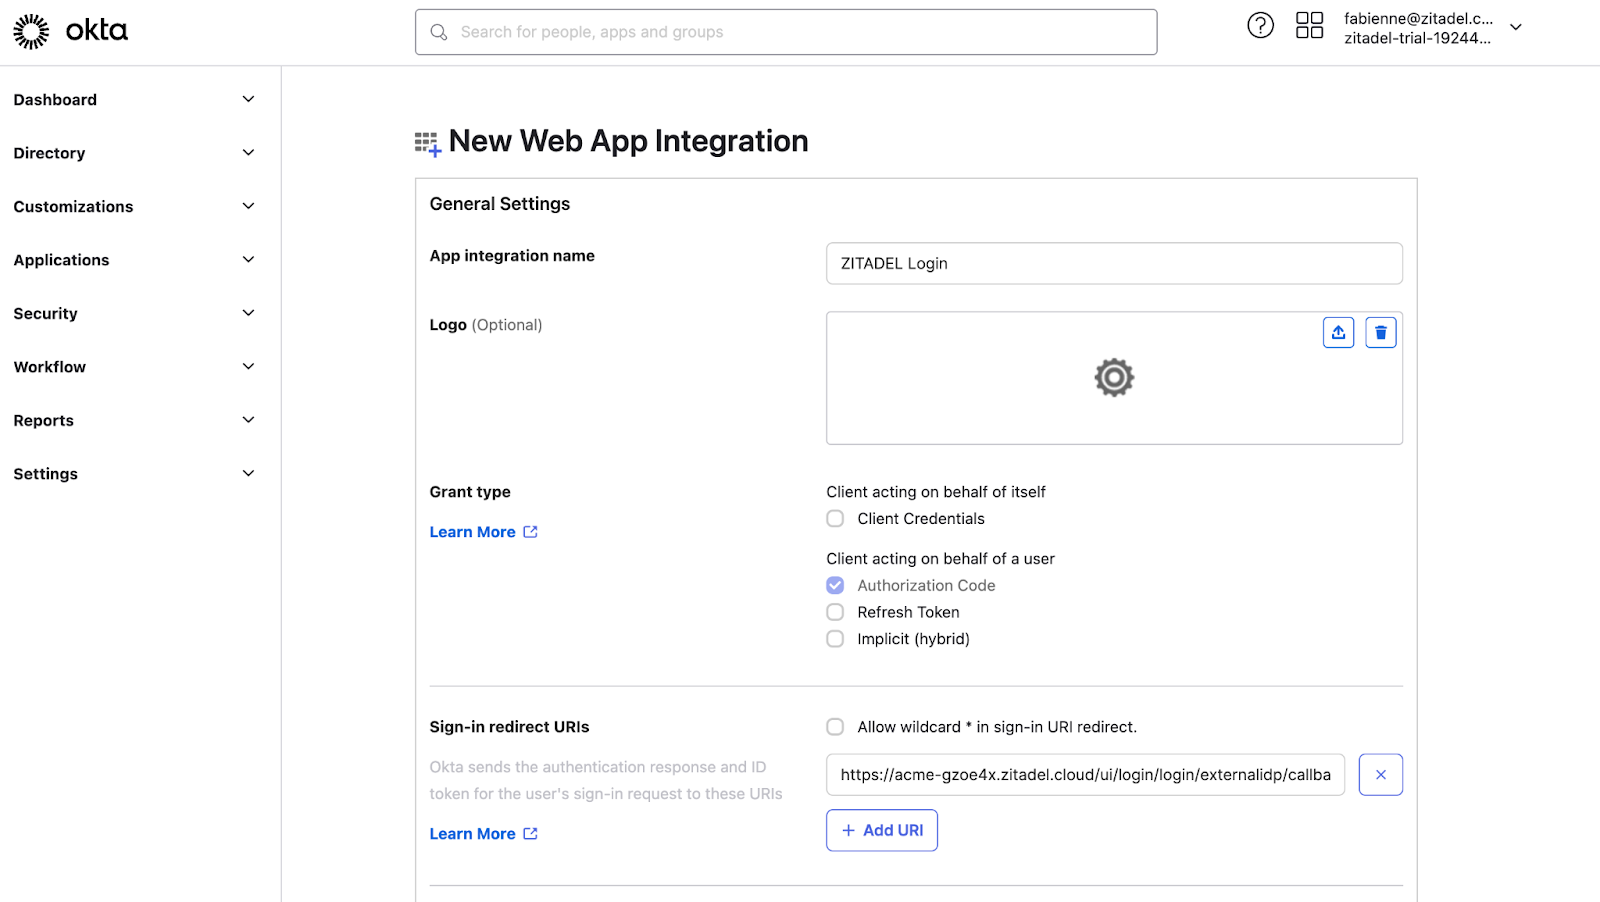 4. Give it an identifiable name (this is for your own purposes to easily identify it among other applications you might have configured).
5. In the `Sign-in redirect URIs` paste the identity service redirect URL which is the following one: [https://id.attention.tech/ui/login/login/externalidp/callback](https://id.attention.tech/ui/login/login/externalidp/callback)
6. Once saved, provide the **Client ID, Secret and Issuer URL** (which will look something like: [https://trial-1925566.okta.com](https://trial-1925566.okta.com)) to your point of contact at Attention. Your Attention point of contact will then notify you once the configuration has been completed.
7. Once the Web Application has been created, add your team members to organization and/or group in Okta that is configured to use this new application.
## **EntraID SAML Setup**
**Register a new enterprise application in EntraID**
1. Navigate to the [Enterprise App registration menu](https://entra.microsoft.com/#view/Microsoft_AAD_IAM/AppGalleryBladeV2).
2. Search for "SAML Toolkit" and click on the `Microsoft Entra SAML Toolkit` card.
3. Change the name if desired and click "Create"
4. Give it an identifiable name (this is for your own purposes to easily identify it among other applications you might have configured).
5. In the `Sign-in redirect URIs` paste the identity service redirect URL which is the following one: [https://id.attention.tech/ui/login/login/externalidp/callback](https://id.attention.tech/ui/login/login/externalidp/callback)
6. Once saved, provide the **Client ID, Secret and Issuer URL** (which will look something like: [https://trial-1925566.okta.com](https://trial-1925566.okta.com)) to your point of contact at Attention. Your Attention point of contact will then notify you once the configuration has been completed.
7. Once the Web Application has been created, add your team members to organization and/or group in Okta that is configured to use this new application.
## **EntraID SAML Setup**
**Register a new enterprise application in EntraID**
1. Navigate to the [Enterprise App registration menu](https://entra.microsoft.com/#view/Microsoft_AAD_IAM/AppGalleryBladeV2).
2. Search for "SAML Toolkit" and click on the `Microsoft Entra SAML Toolkit` card.
3. Change the name if desired and click "Create"
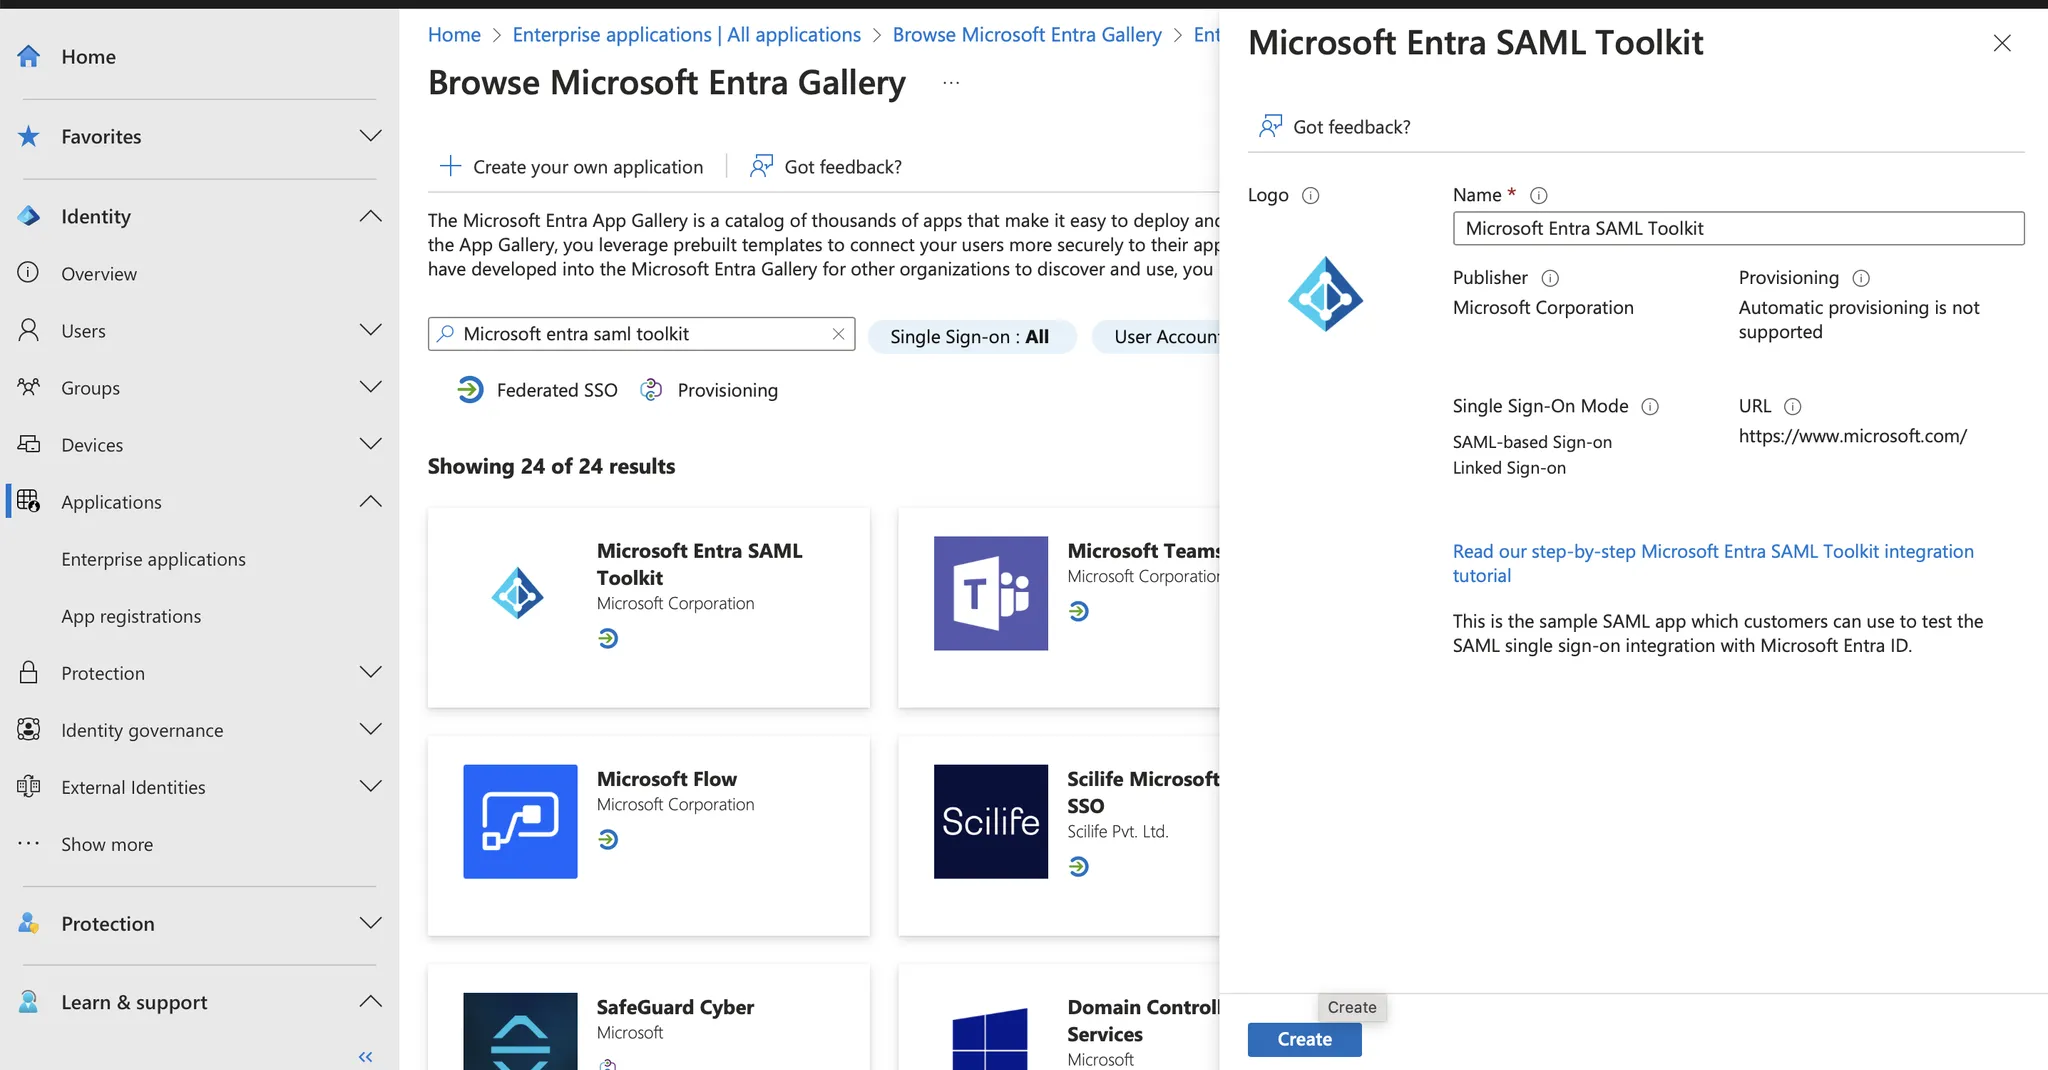 4. This will create an application that will be configured in the subsequent steps.
 ### **Configure SAML**
1. Click on the Application and Go to `Manage`> `Single sign-on`
2. Select SAML
### **Configure SAML**
1. Click on the Application and Go to `Manage`> `Single sign-on`
2. Select SAML
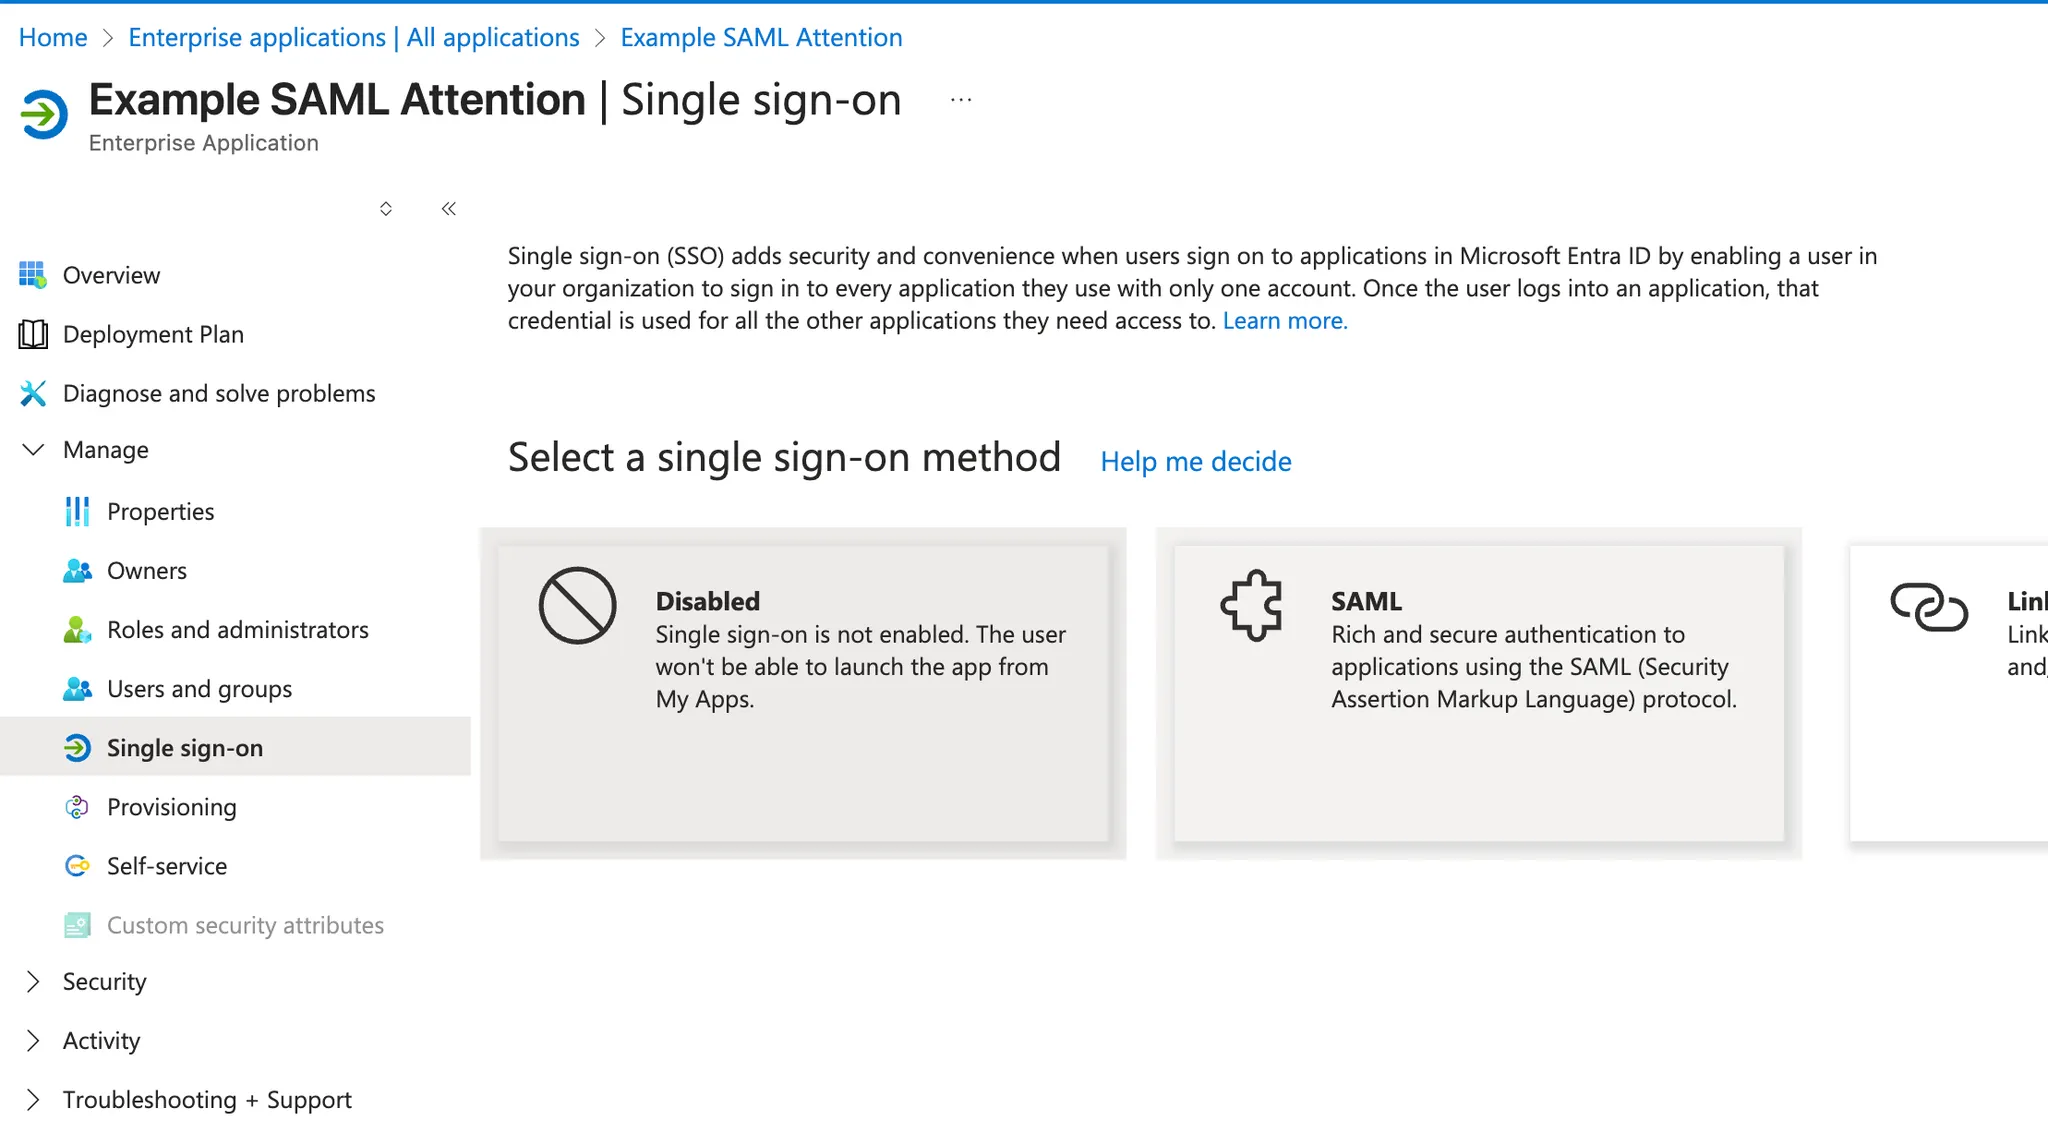 3. Once redirected to the Single Sign-On details, copy the URL from `SAML Certificates` > `App Federation Metadata URL` to your clipboard
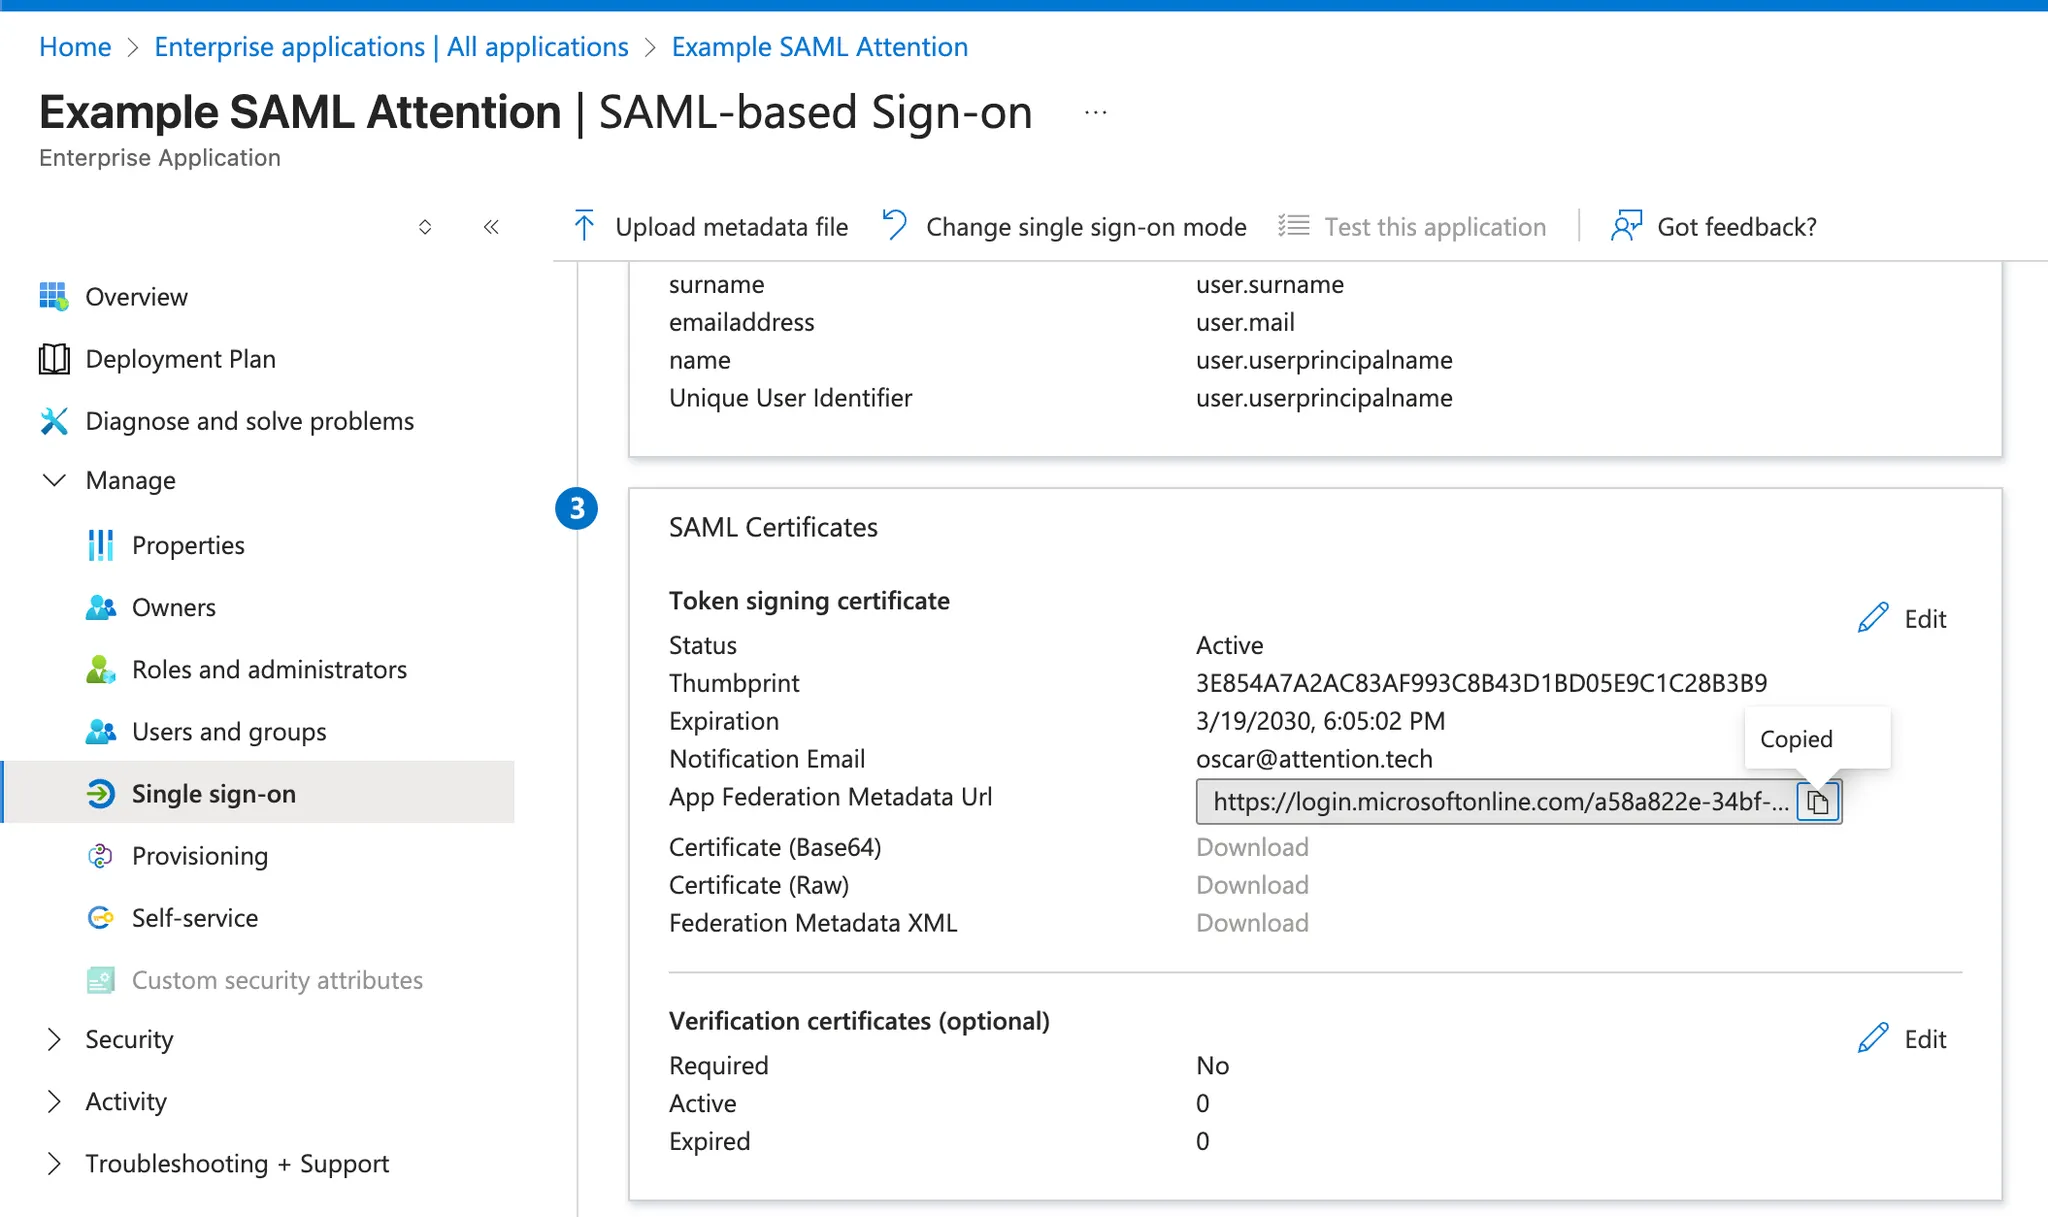 The URL will look like the following:
[https://login.microsoftonline.com/a58a822e-34bf-4955-b034-000000000/federationmetadata/2007-06/federationmetadata.xml?appid=3e1dde4d-f7b2-4836-000-00000000](https://login.microsoftonline.com/a58a822e-34bf-4955-b034-000000000/federationmetadata/2007-06/federationmetadata.xml?appid=3e1dde4d-f7b2-4836-000-00000000)
4. Provide this URL to your point of contact at Attention.
5. The Attention team will then provide a series of URLs like the following:
> Entity ID URL: [https://id.attention.tech/idps/00000000000000000000/saml/metadata](https://id.attention.tech/idps/00000000000000000000/saml/metadata) Reply URL: [https://id.attention.tech/ui/login/login/externalidp/saml/acs](https://id.attention.tech/ui/login/login/externalidp/saml/acs) \
> Sign On URL: [https://id.attention.tech/ui/login/login/externalidp/saml/acs](https://id.attention.tech/ui/login/login/externalidp/saml/acs) \
> Logout URL: [https://id.attention.tech/idps/00000000000000000000/saml/slo](https://id.attention.tech/idps/00000000000000000000/saml/slo)
6. Return to the `Single sign-On` settings of your application and click Edit on `Basic SAML Configuration`
The URL will look like the following:
[https://login.microsoftonline.com/a58a822e-34bf-4955-b034-000000000/federationmetadata/2007-06/federationmetadata.xml?appid=3e1dde4d-f7b2-4836-000-00000000](https://login.microsoftonline.com/a58a822e-34bf-4955-b034-000000000/federationmetadata/2007-06/federationmetadata.xml?appid=3e1dde4d-f7b2-4836-000-00000000)
4. Provide this URL to your point of contact at Attention.
5. The Attention team will then provide a series of URLs like the following:
> Entity ID URL: [https://id.attention.tech/idps/00000000000000000000/saml/metadata](https://id.attention.tech/idps/00000000000000000000/saml/metadata) Reply URL: [https://id.attention.tech/ui/login/login/externalidp/saml/acs](https://id.attention.tech/ui/login/login/externalidp/saml/acs) \
> Sign On URL: [https://id.attention.tech/ui/login/login/externalidp/saml/acs](https://id.attention.tech/ui/login/login/externalidp/saml/acs) \
> Logout URL: [https://id.attention.tech/idps/00000000000000000000/saml/slo](https://id.attention.tech/idps/00000000000000000000/saml/slo)
6. Return to the `Single sign-On` settings of your application and click Edit on `Basic SAML Configuration`
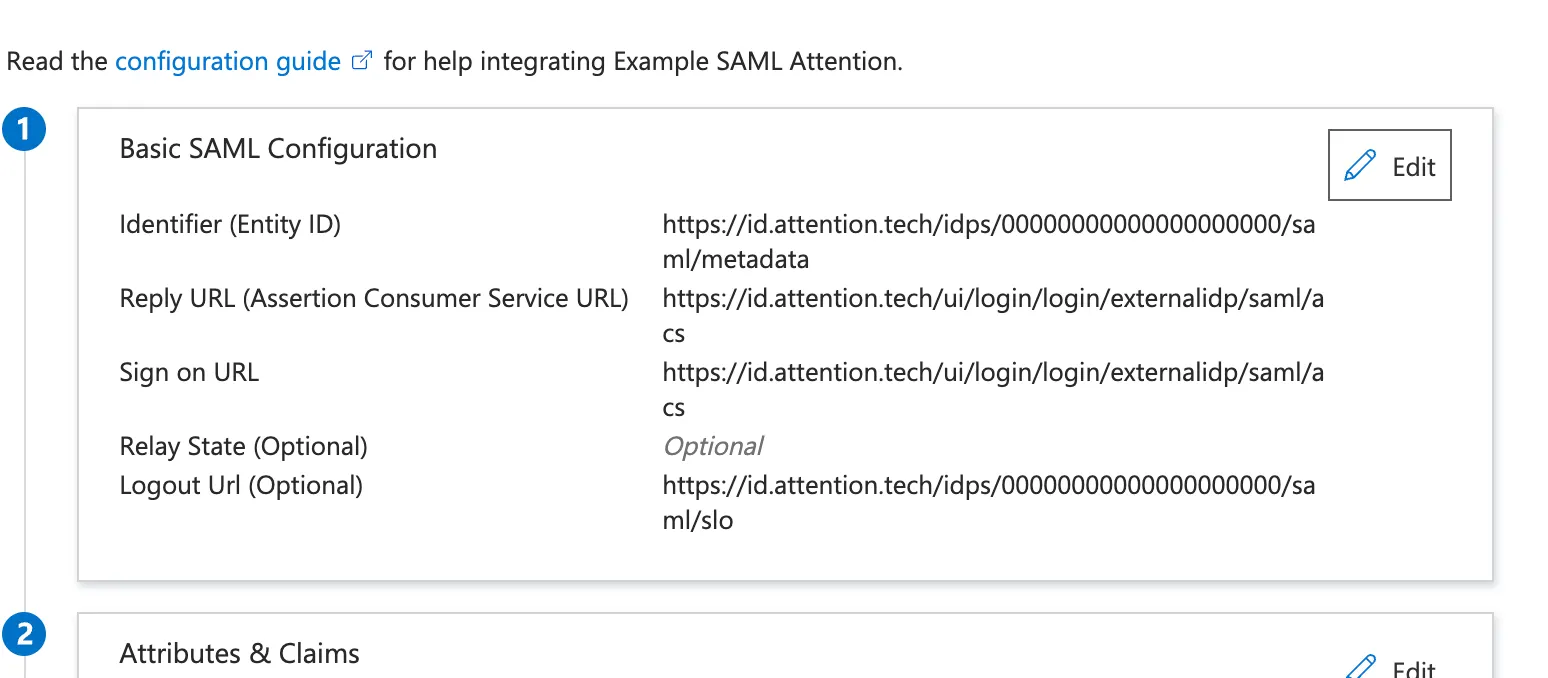
 7. Paste in the URLs provided by the Attention team to each matching field. Leave `Relay State URL` empty.
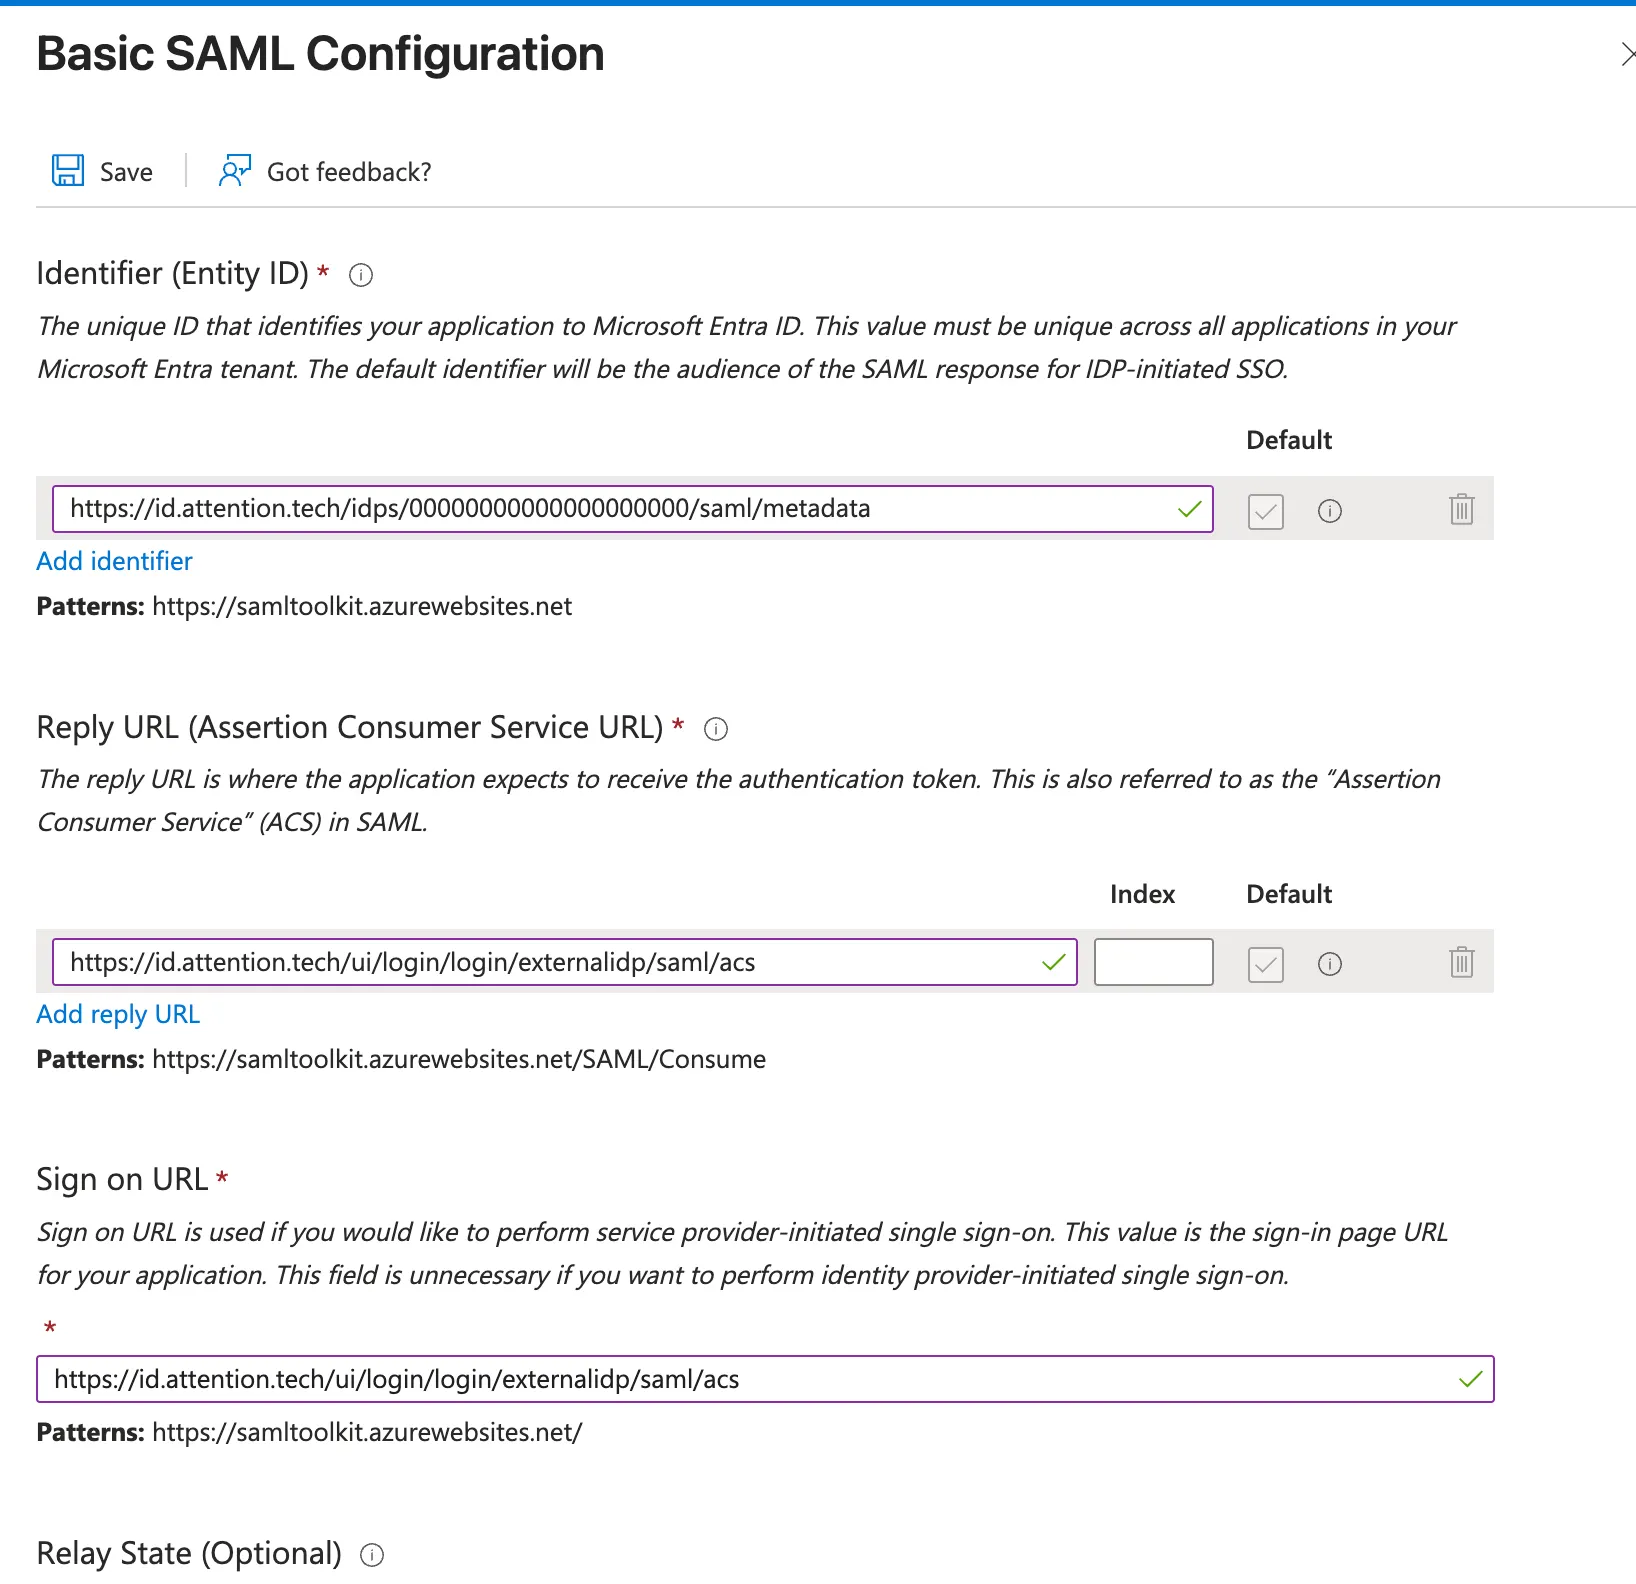 8. Save changes and confirm your `Basic SAML Configuration` section now looks like this:
 9. Once completed, notify your Attention point of contact.
10. The Attention team will follow up provide the URL needed to log in using EntraID. This URL will take you directly to your EntraID login. Once users login, they will be redirected to the Attention homepage.
NOTE: The authentication mechanism does not auto-provision users on Attention. Users must be invited to Attention before trying to authenticate via EntraID.
### Configure User Requirements for App Access
There are 2 options for requiring Attention users to authenticate via EntraID.
**Option 1:** Assign users and groups manually via the settings in `Manage` > `Users and groups`
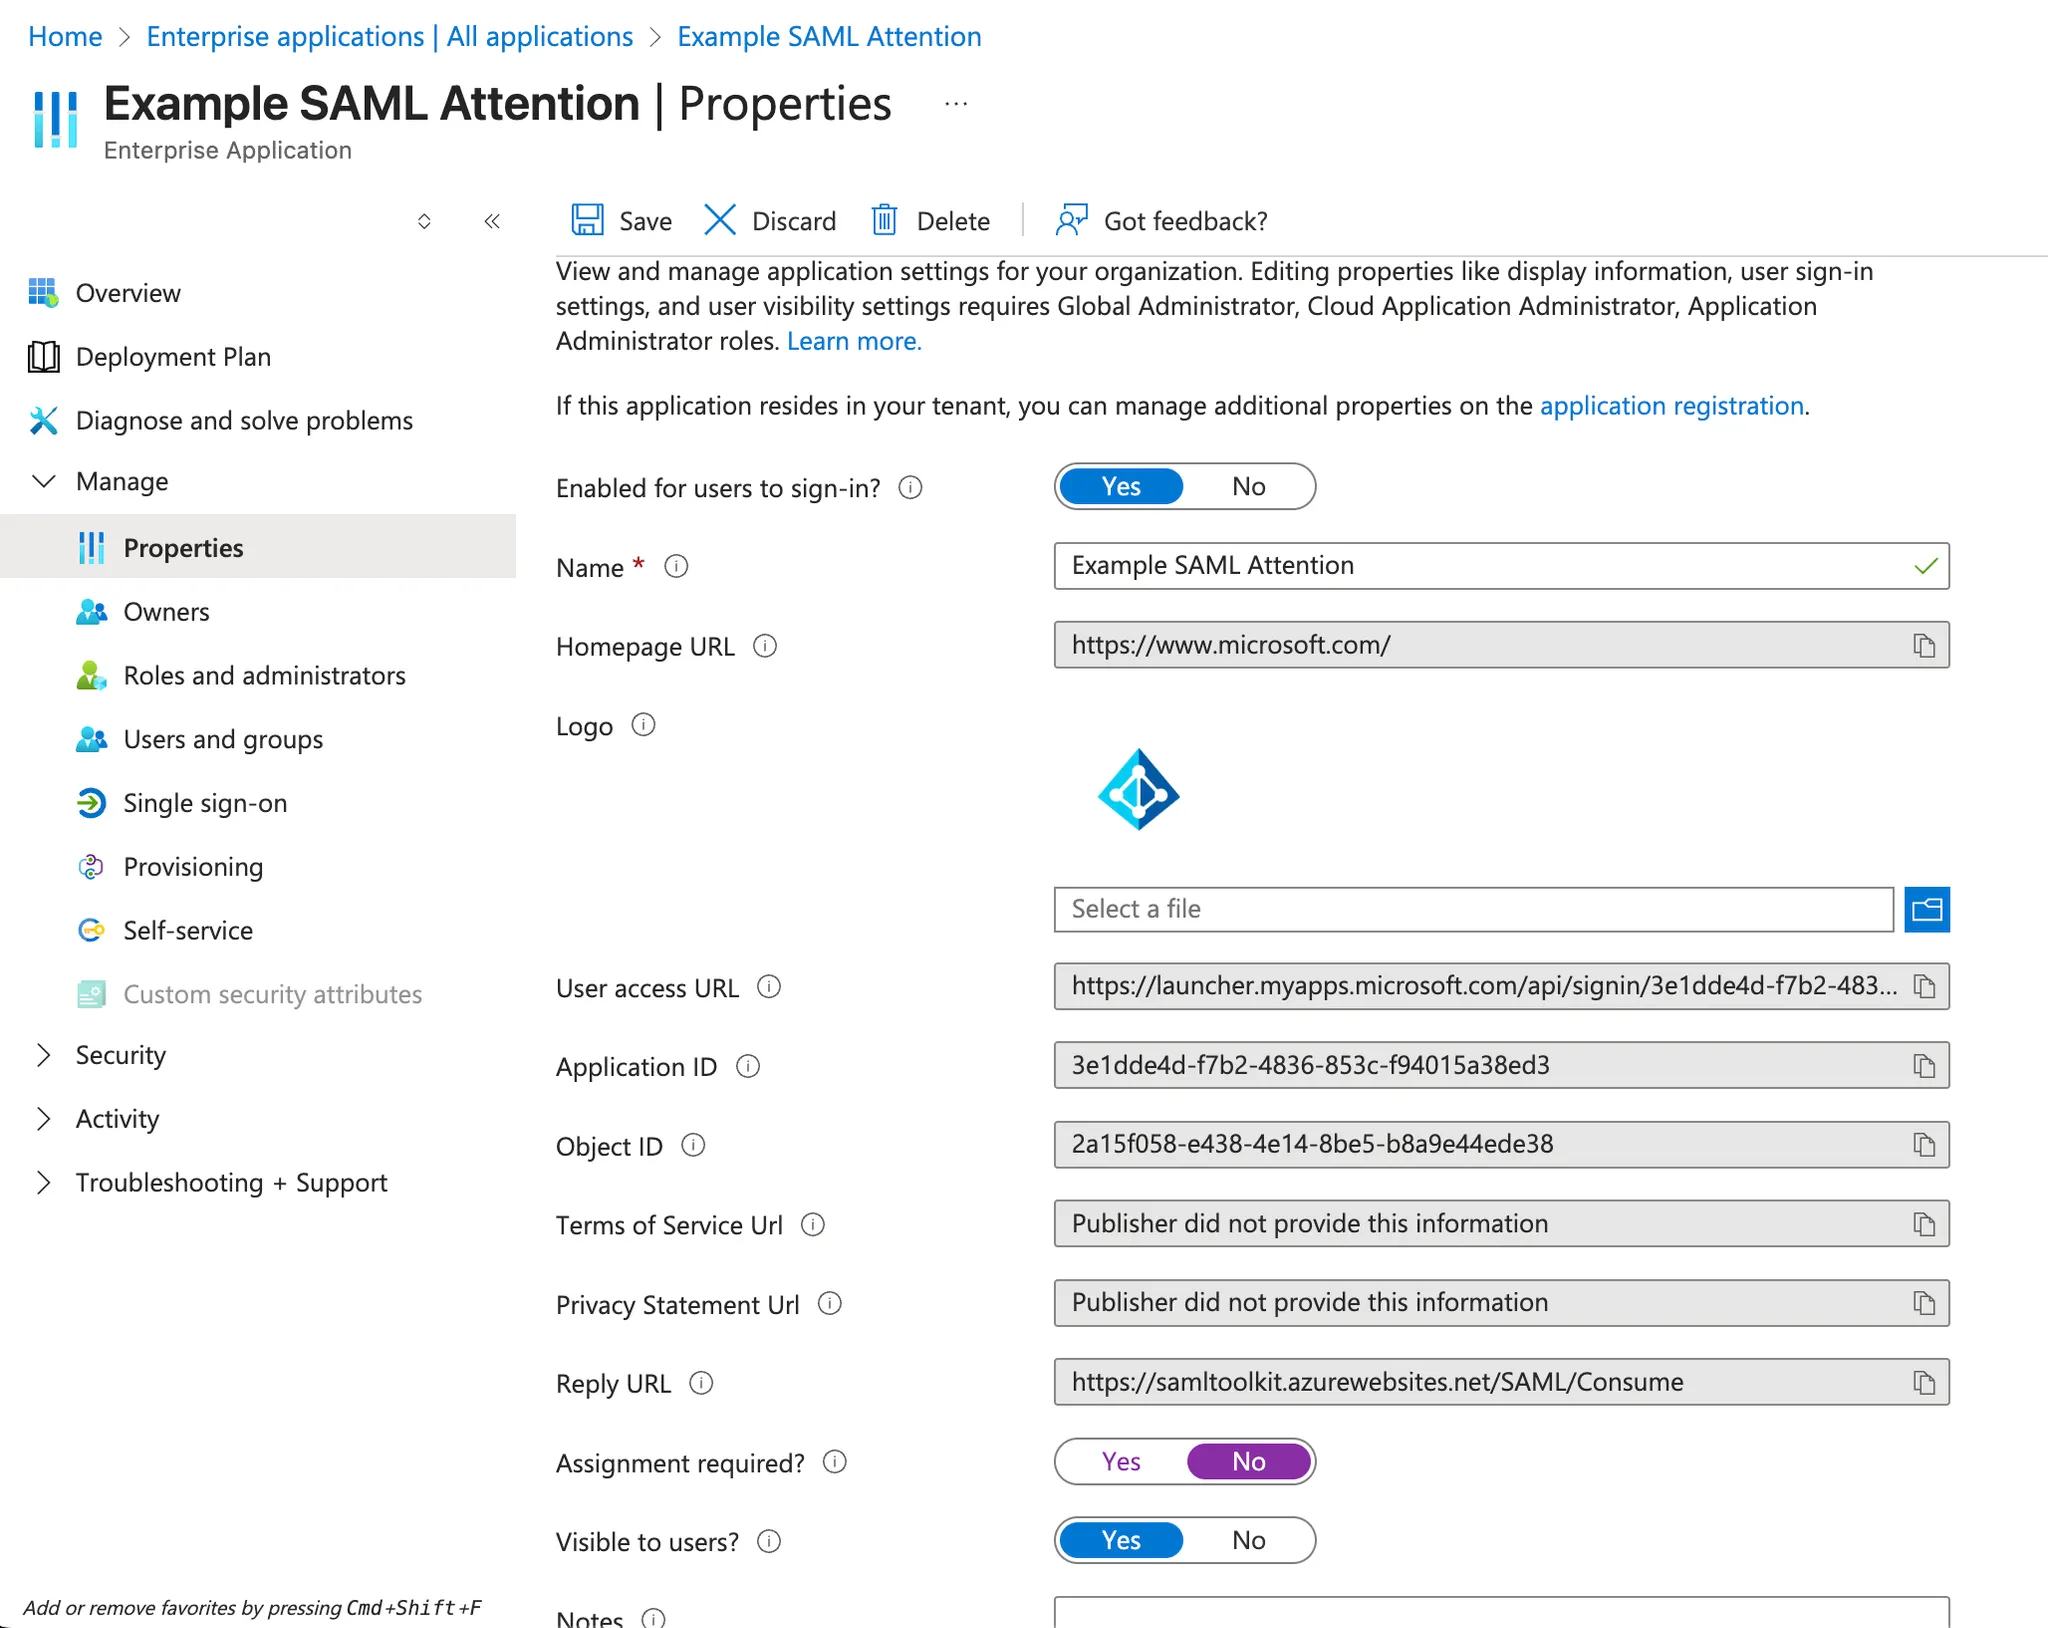
\*\*Option 2: \*\*Require all Attention users to authenticate by default. \
To do this, naviagate to `Manage` > `Properties` and set `Assignment required?` to "No"
9. Once completed, notify your Attention point of contact.
10. The Attention team will follow up provide the URL needed to log in using EntraID. This URL will take you directly to your EntraID login. Once users login, they will be redirected to the Attention homepage.
NOTE: The authentication mechanism does not auto-provision users on Attention. Users must be invited to Attention before trying to authenticate via EntraID.
### Configure User Requirements for App Access
There are 2 options for requiring Attention users to authenticate via EntraID.
**Option 1:** Assign users and groups manually via the settings in `Manage` > `Users and groups`
\*\*Option 2: \*\*Require all Attention users to authenticate by default. \
To do this, naviagate to `Manage` > `Properties` and set `Assignment required?` to "No"